|
|
|
|
 The aim
of this exercise is to set up a basic 8 channel mixer for a Reaper project. This will work on the minimum
3 DSP Luna card with DSP to
spare. It will include routing to allow recording of live signals
from you card's analog input, and routing to loop the entire mix
back to Reaper for final mixdown.
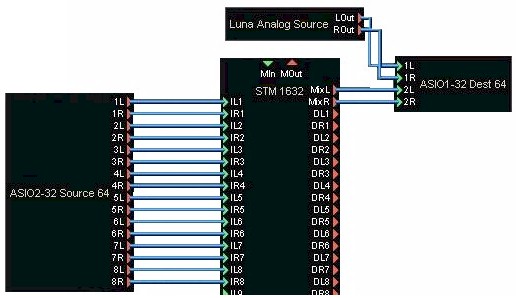
- Create a new Scope project
and add:
- ASIO Source (8 channels),
- STM 1632 Mixer,
- ASIO Destination (2 Stereo
Channels)
- Analog Source
- Connect the components as
shown ===>
|
|
|
|
|
|
|
|

-
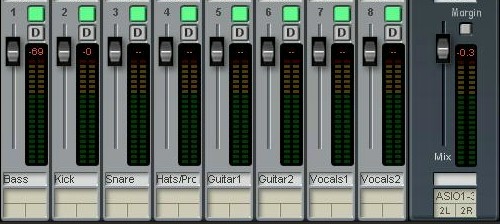
Double click on the STM1632
mixer so that the full graphical view opens.
-
Click into the small track name
space under the channel 1 fader and type 'Bass' (or whatever name
you want to give it).
-
Rename the other 7 channels
appropriately as per example shown.
|
|
|
|
|
|
|
|

-
Open Reaper. If you are
prompted for Audio Settings then just select Audio /
Device. If not just select 'Preferences' from the Options
menu and select 'Audio / Device'.
-
Select 'ASIO' from the 'Audio
System' drop-down.
-
Select 'ASIO SCOPE' from the
ASIO Driver drop-down.
-
Click on the 'Enable Inputs'
check box to set it checked.
-
Select the first numbered
Scope Input from the 'first' input drop-down.
-
Select the last numbered
Scope Input from the 'last' input drop-down.
-
Select the first numbered
Scope Output from the 'first' output drop-down.
-
Select the last numbered
Scope Output from the 'last' output drop-down.
-
Select the 'OK' push button.
|
|

|
|
|
|
|
|

-
In Reaper, select 'Track /
Insert New Track' from the Track menu.
-
Select the newly created
track and overtype the track title with 'Guitar'.
|
|
|
|
|
|
|

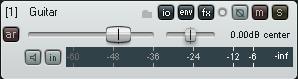
-
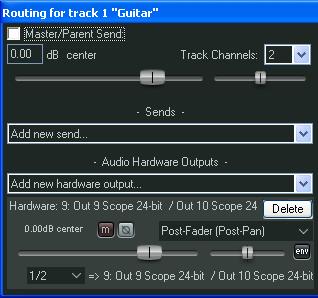
Select the small 'io' icon to
the right of your track title. A 'Routing for Track'
window will pop up.
-
Select 'Out 9 Scope / Out 10
Scope' from the 'Add new hardware output' drop-down. Note
this corresponds to stereo channel 5 on your STM mixer as two Scope outputs in Reaper correspond to
one stereo channel on the
Scope STM1632 mixer.
-
Uncheck the 'Master/Parent
Send' check box. Do this to prevent this channel from being
output to your first Scope output as well as the nominated (5th)
one.
-
Close the 'Routing for Track'
pop-up window.
|
|
|
|
|
|
|
|

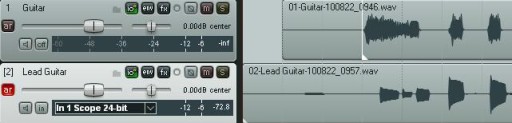
-
Select the small 'ar' icon to
the left, below your track title. This will arm your
Guitar track for recording. A small 'inputs' drop-down
should appear below the track slider.
-
Leave the
default setting of 'In 1 Scope' selected in the input drop-down
box.
-
Play
your instrument to check that an input signal appears. Level
graphics should appear just to the right if the 'inputs'
drop-down.
-
Press
the red 'Record' button  and record your instrument.
-
Press
'Stop' when finished.
|
|
|
|

-
For
each additional track you wish to overdub, repeat the above
three steps (e.g. the 'Adding the Audio Track', 'Setting the Output of
the Audio Track' and 'Recording the Audio Track' steps).
-
Ensure
that you record disarm all previous tracks such that only your
current recording track has the 'ar' icon glowing red.
|
|
|