
|
|
-
From
the Scope Live Bar menu, select 'Set / Settings' (see
left).
-
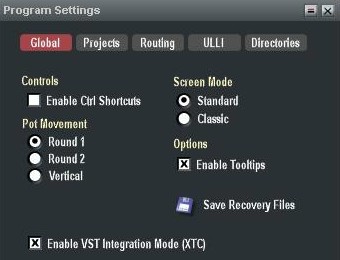
The
Program Settings window will popup (see right).
-
Select
the 'Enable VST Integration Mode (XTC)' checkbox.
-
Close
Scope. Note Scope must be closed for XTC mode to activate.
-
Start
up Cubase.
|
|
|
|
|
|
|
|
|
|

|
|
-
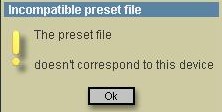
If
this is the first time you have used XTC then you need to update
your plug-in information, otherwise skip this step.
-
From
the Cubase main menu, select 'Devices / Plug-in
Information'. The 'Plug-in Information' window will open.
-
Press
the 'Update' button and wait a few minutes.
|
|
|
|
Ignore this message if you had an
older version of Scope on your PC.
|
|
|
|
|
|
|
 |
|
-
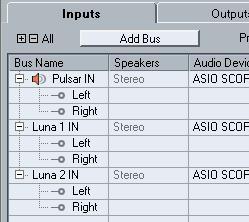
From
the Cubase main menu, select 'Devices / VST Connections'. The
'VST Connections' window will open (see left).
-
Select
the 'Inputs' tab. By default, one Scope input will already
be present.
-
Right click
and select 'Add Buss / Stereo'. The next Scope input will
be added to the list. Repeat for all inputs.
-
Rename the
input busses if desired by overtyping the Bus Names (see right).
|
|
 |
|
|
|
|
|
|
|
|
-
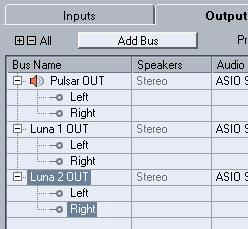
Select
the 'Output' tab of the VST Connections window. By default, one Scope
output will already
be present.
-
Right click
and select 'Add Buss / Stereo'. The next Scope output will
be added to the list. Repeat for all outputs.
-
Rename the
output busses if desired by over-typing the Bus Names (see right).
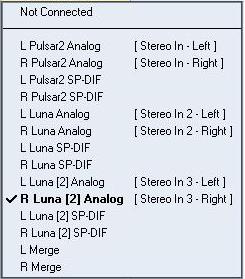
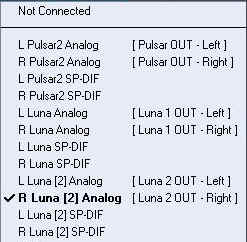
- You may change the individual ports by
right clicking on any of the 'Device Ports'. A popup
selection window will appear for this purpose (see right).
|
|
|
|
|
|
TIPS FROM KWILD ON HOW TO MAKE XTC WORK IN SCOPE 5 |
|
|
- Go to /App/Bin and open
cset.ini , change XTCMode=0 to 1.
Under [SEQPATH]
add the folder you have put the .dll's for your vst host (example
c:\VSTPLUGINS\XTC)
So it will be :
[SEQPATH]
Path1=C:\VSTPLUGIN/XTC
- Create a folder /DEVICEXTC into
/SCOPE PCI installation path and put all the .dev and .mdl you want
to use as XTC.
- Go to your old SFP4
installation App/Bin take SCOPEVST.CFG and copy to the folder /SCOPE
PCI/App/Bin
- Edit SCOPEVST.CFG and point to
/SCOPE PCI/DEVICEXTC and subfolders , example :
ScopeMono C:/SCOPE PCI/DevicesXTC/Mono/*.* (if u wanna put mono
effects into /Mono)
ScopeStereo C:/SCOPE PCI/DevicesXTC/Effects/*.dev (if u wanna put
effects into /Effects)
ScopeSynth C:/SCOPE PCI/DevicesXTC/SYNTH/*.* (if u wanna put Synths
into /SYNTH)
- Go to the folder where you have
the XTC .dll's for your VST HOST (Ex. C:\VSTPLUGIN\XTC) and edit
XTC.INI to point into /SCOPE PCI :
[SCOPE]
Application=C:/SCOPE PCI/App/XTCAPP/XTC.pro
Bin=C:/SCOPE PCI/APP/BIN
Config=XTC-Config
Create the .dll's for the devices you wanna use as XTC and put it
into C:\VSTPLUGINS\XTC.
|
|
|
|
Dante and KWILD October 2010
|
|
For more advanced configuration information check the PlanetZ XTC
Patch Guide |