I never owned the revered Roland Space Echo, but I remember in my youth spending countless hours jamming with a cheap electric guitar plugged into a Melos Echo Chamber.  Playing with a tempo that matched the speed knob produced a hypnotic layering effect.  Playing at 2/3 of the unit's tempo produced interesting triplet runs.

Nowadays with this sort of equipment being virtualized, units such as the Roland Space Echo have been successfully recreated to recapture this classic effect.  However, with the possibilities of Scope Modular IV now containing a tape echo module I decided to follow in the footsteps of experienced modular warriors and take the classic tape echo effect beyond the capabilities of their original counterparts.

Eventually I replaced the Melos with a Boss digital delay pedal, but in retrospect I should have kept the Melos, as it had a sound that was not totally replicated in the digital domain, mainly due to the pitch changing and high-end roll-off characteristics of analog tape.  In any case, my aim in this article was to not only reproduce the character of the old tape delay but also to add some stereo dimension with the use of a MIDI foot controller, suitable to live guitar jamming.


  1. First download the CCx2 device from SpaceF Devices.

  2. Set up your Scope Project as per illustrated on the right.  Substitute a Scope MIDI source for live use.

  3. If you want all MIDI CC values to pass through to the Modular, then insert a MIDI Merge device after the CCx2 that also connects the MIDI source to the Modular device.

  4. I have added a couple of MIDI Monitor modules so that you can view the MIDI streams for debugging purposes.  These can be removed once you are satisfied that everything is working.


  1. Start off with a blank Modular patch and simply add two Tape Delay modules.

  2. Connect Audio In 1 to the input of the first Tape Delay

  3. Connect the output of the first Tape Delay to Audio Out 1

  4. Connect Audio In 2 to the input of the second Tape Delay

  5. Connect the output of the second Tape Delay to Audio Out 2

  6. Right click the 'Speed' knob on the first Tape Delay and assign it to CC5.

  7. Right click the 'Speed' knob on the second Tape Delay and assign it to CC93.

  8. Right click the 'Feedback' knob on the first Tape Delay and assign it to CC6.

  9. Right click the 'Feedback' knob on the second Tape Delay and assign it to CC94.


  1. Open the CCx2 module and assign the MIDI input and output channels to match the input to your controller and the output to the Modular IV module.

  2. Right click on the 'CC In 1' fader and assign it to CC11.

  3. Set the left hand CC Num outputs to '6' of '94' respectively.

  4. Set the right hand CC Num outputs to '7' and '95 respectively.

  5. Set the right hand Multiplier to 1.50 (you can try other rhythmical values later).

  6. Set all lag times to 0.

  7. Set the left hand Multiplier to 1.30 for a start.  This will give a 'pan' effect when playing single notes with a few beats wait in between.

  8. Set the curve modifiers to LIN initially but you can experiment with these later on.


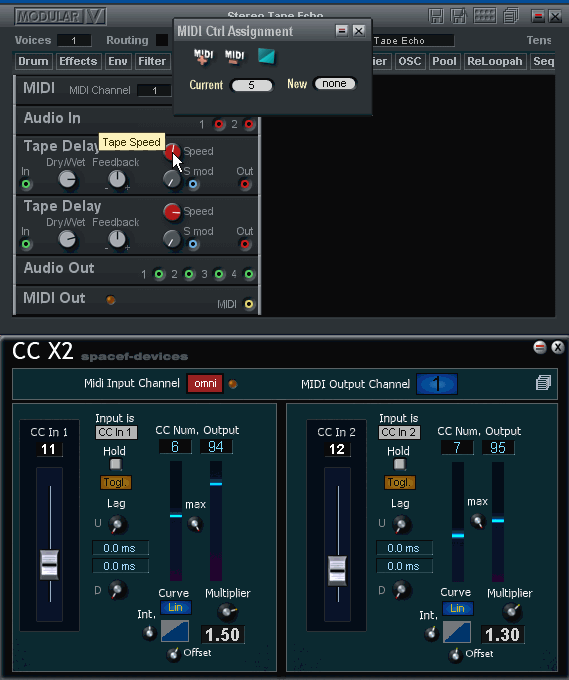
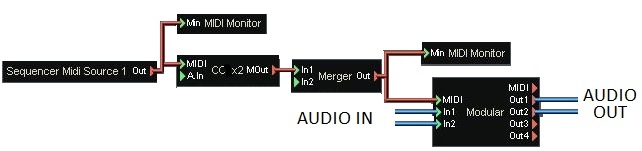
The curves in CCx2 are the same found on synths: like velocity curves or aftertouch and they apply logarithmic, linear or exponential calculations to transform the input according to the curve chosen by the user.  This is a basic set-up and you can experiment with Lag times and Curve Modifiers to achieve varied and interesting results.

The CCx2 was especially supplied by SpaceF devices and is a variation of the SpaceF CC2x2 which works on set offsets rather than a Multiplier value.  This is another example of the unique co-operation between users and developers that occurs on the Scope platform.

Many thanks to SpaceF.


Dante December 2010